Windows Server Core Full Configuration with PowerShell
How to Configure Server Core with Active Directory Services, DNS, and DHCP Using Nothing But PowerShell
Windows Server 2012 offers two installation options: Server Core or “Server with a GUI”. This begs the question: Why would you want to install Server Core instead of the GUI? One reason may be that you have limited physical hardware resources and want to keep the footprint as small as possible.
Recently I needed to build a domain controller, DHCP, and DNS server for a branch office. This office has a Riverbed Steelhead WAN optimization appliance which runs a nested VMware ESXi hypervisor. The appliance has limited memory and disk space, so I needed to keep the installation as small as possible (Incidentally, if I only needed DNS and DHCP, I would have just installed RedHat Enterprise Linux, but having the server be an Active Directory domain controller was also a requirement.)
I’m going to show you step-by-step how I configured Active Directory Services, DNS, and DHCP on a Windows Server 2012 Server Core installation.
To begin you will need the following:
- A physical or virtual server with a fresh install of Windows Server 2012 Server Core
- At least one connected network interface
- 2 GB RAM minimum
- 40 GB virtual or hard disk for the Server installation
- 4 GB virtual or hard disk for the swap file (NTFS-formatted during the installation)
- A management workstation with PowerShell installed
Log in as the local administrator, and we’ll begin by configuring basic networking.
Network Configuration
- First we’re going to get the name of the network adapter so we can rename it to something more friendly.
1get-netadapter
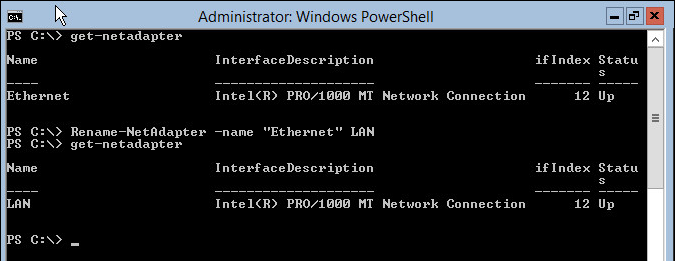
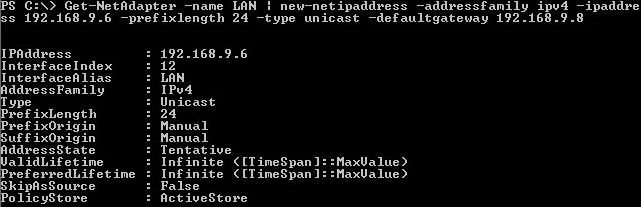
- Now let’s rename it to “LAN” and assign it a unicast IP address of 192.168.9.6/24 with a default gateway of 192.168.9.8.
1Rename-NetAdapter -name "Ethernet" LAN
2get-netadapter -name LAN | new-netipaddress -addressfamily IPv4 -IPaddress 192.168.9.6 -prefixlength 24 -type unicast -defaultgateway 192.168.9.8
- Set the DNS servers to 192.168.20.80 and 192.168.20.81
1set-dnsclientserveraddress -interfacealias LAN -serveraddresses 192.168.20.80,192.168.20.8
- Verify the configuration with:
 1$ Get-DnsClientServerAddress -interfacealias LAN | format-list
 2
 3InterfaceAlias  : LAN
 4InterfaceIndex  : 12
 5AddressFamily   : IPv4
 6ServerAddresses : {192.168.20.80, 192.168.20.81, 127.0.0.1}
 7
 8InterfaceAlias  : LAN
 9InterfaceIndex  : 12
10AddressFamily   : IPv6
11ServerAddresses : {::1}
Enable Remote Access
- I always like to have three methods of accessing a server. In this case, I have console access through VMware ESXi, but I also want to be able to use RDP and PowerShell Remoting. Let’s configure the latter two now.
1enable-psremoting
2cscript C:\Windows\System32\Scregedit.wsf /ar 0
- Temporarily turn off the Windows Firewall.
1netsh advfirewall set allprofiles state off
Configure PowerShell Remoting
From this point forward, we will use PowerShell Remoting to finish the configuration of the server.
-
Switch to your management workstation and launch PowerShell as an Administrator
-
Allow connections to any host and open a new PowerShell session to the target server.
1Set-Item WSMan:\localhost\Client\TrustedHosts -Value "*" -Force
2New-PSSession -computername 192.168.9.6 -credential administrator
If the connection is successful, PowerShell will display the new connection as follows:

- Enter the new PowerShell session
1Enter-PSSession 1
The PowerShell prompt will change indicating you are now connected to the target server.
![]()
Set Swap/Paging File Location
Since our server has a small amount of RAM, the paging or swap file is going to be very important to the reliability of the server. We want to keep it on a separate volume so that an out-of-control process filling up the system volume doesn’t prevent the server from growing the paging file as needed. In this case, C: is the system volume and D: is the volume for the paging file.
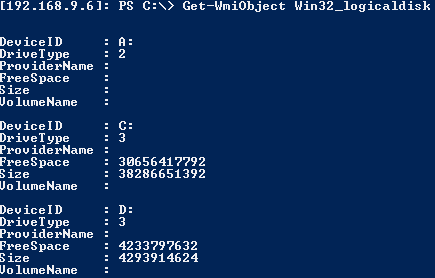
- Get free space on D:
1get-wmiobject win32_logicaldisk
- Set the paging file to fill almost all free space on D:
1$CurrentPageFile = gwmi -Query "select * from Win32_PageFileSetting where name='c:\\pagefile.sys'" -EnableAllPrivileges
2If($CurrentPageFile){$CurrentPageFile.Delete()}
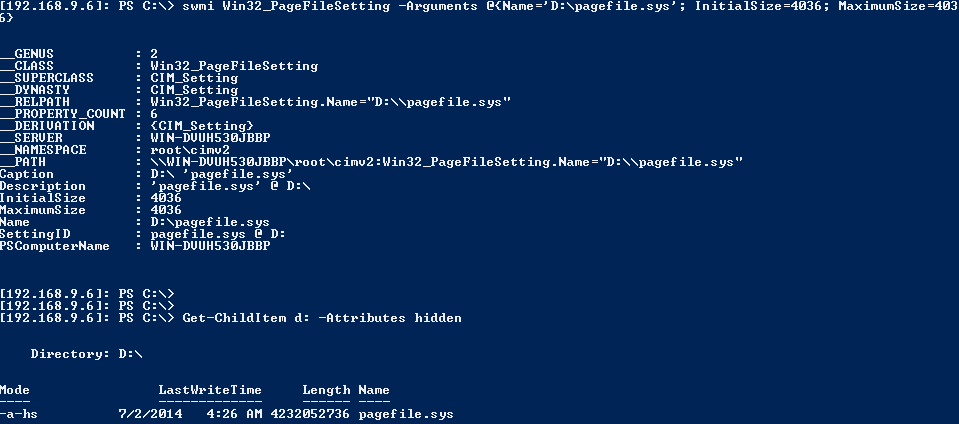
3swmi Win32_PageFileSetting -Arguments @{Name='D:\pagefile.sys'; InitialSize=4036; MaximumSize=4036}
- Verify the paging file was created
1get-childitem d: -attributes hidden
- Disable automatic paging file size
1gwmi Win32_ComputerSystem -EnableAllPrivileges | swmi -Arguments @{AutomaticManagedPagefile=$false}
Join the server to Active Directory and Promote it to Domain Controller Status
- Rename the computer if needed using the cmdlet
1Rename-Computer
- Add the computer to the domain benpiper.com and reboot
1add-computer -domainname benpiper.com
- Install Active Directory Domain Services
1Install-WindowsFeature -name AD-Domain-Services
If all is well, you should see the “Success” exit code.

- Promote the server to a domain controller
1Install-ADDSDomainController -credential (get-credential)
After running through some tests and making changes to Active Directory, the server should now be a replica domain controller. Go ahead and reboot it again for good measure.
Install and Configure DHCP
We’re going to initially create just one IPv4 scope. The server will provide an IP address, DNS and WINS servers, and a default gateway.
- Install DHCP services
1install-windowsfeature -name dhcp
- Create the IPv4 scope
1Add-DhcpServerv4Scope -StartRange 192.168.9.100 -EndRange 192.168.9.240 -SubnetMask 255.255.255.0 -LeaseDuration 14.0:0:0 -Name "Data" -ActivatePolicies 0
This newly created scope will be identified with a Scope ID which can be retrieved with the cmdlet
1get-dhcpserverv4scope
- Add DHCP options to the scope: DNS, default gateway (router), and WINS
1Set-DhcpServerv4OptionValue -scopeID 192.168.9.0 -DNSServer 192.168.9.6,192.168.20.80,192.168.20.81 -DNSDomain benpiper.com -Router 192.168.9.8 -WinsServer 172.16.51.5,172.17.51.2
- Finally, verify the scope and options with
 1$ Get-DhcpServerv4OptionValue -scopeid 192.168.9.0 | Format-List
 2
 3OptionId    : 51
 4Name        : Lease
 5Type        : DWord
 6Value       : {1209600}
 7VendorClass :
 8UserClass   :
 9PolicyName  :
10
11OptionId    : 15
12Name        : DNS Domain Name
13Type        : String
14Value       : {benpiper.com}
15VendorClass :
16UserClass   :
17PolicyName  :
18
19OptionId    : 3
20Name        : Router
21Type        : IPv4Address
22Value       : {192.168.9.8}
23VendorClass :
24UserClass   :
25PolicyName  :
26
27OptionId    : 6
28Name        : DNS Servers
29Type        : IPv4Address
30Value       : {192.168.9.6, 192.168.20.80, 192.168.20.81}
31VendorClass :
32UserClass   :
33PolicyName  :
34
35OptionId    : 44
36Name        : WINS/NBNS Servers
37Type        : IPv4Address
38Value       : {172.16.51.5, 172.17.51.2}
39VendorClass :
40UserClass   :
41PolicyName  :
42
Notice that I added this new server’s IP (192.168.9.6) as the primary DNS server. When we promoted this server to a domain controller, DNS was automatically installed and configured as part of Active Directory integrated DNS.
- Prior to this new server, DHCP was handled by a Cisco L3 switch. Since there are existing leases and since we may add a secondary server in the future, we want to enable conflict detection.
1Set-DhcpServerSetting -ConflictDetectionAttempts 1
Verify the setting with
 1$ Get-DhcpServerSetting
 2
 3IsDomainJoined            : True
 4IsAuthorized              : False
 5DynamicBootp              : True
 6RestoreStatus             : False
 7ConflictDetectionAttempts : 1
 8NpsUnreachableAction      : Full
 9NapEnabled                : False
10ActivatePolicies          : True
11
- Last but not least, we must authorize this DHCP server in Active Directory.
1Add-DhcpServerInDC
Your DHCP server is now up and running. Verify DHCP bindings/leases with
1Get-DhcpServerv4Lease -scope 192.168.9.0